


How to Learn Shadowboxing at Home: Shadowboxing looks simple from the outside, but when you actually start doing it, you realize it’s a full-body workout that needs control, timing, and coordination. The good thing is you don’t need a boxing bag, gloves, or a gym to begin. Just a small space at home is enough to get started.
Many people think boxing training always needs equipment, but shadowboxing is actually the base of everything. It teaches movement, balance, and how to control your body while staying active.
My Small Story and How I Built My Own Routine


I’ll be honest.. I don’t have a boxing bag, and I never used one while starting. I didn’t go to a boxing gym either. I simply started shadowboxing at home with basic space, a mirror, and later I added small tools like an agility ladder and floor tape for footwork.
At first, it felt awkward because I was just punching the air. But slowly, I understood that shadowboxing is not about hitting something.. it’s about learning control, movement, speed, and rhythm. Once I started treating it like real training instead of random punching, everything changed.
Now it feels like a full workout session that improves my fitness, focus, and coordination all at once.
My plan became very basic but effective – in the morning I focused on shadowboxing, footwork, and agility ladder drills, and in the evening I added strength training and core exercises.
This simple split routine helped me stay consistent because I wasn’t doing everything at once. It kept my energy balanced throughout the day, and I didn’t feel overtrained. Over time, this approach made my fitness more organized and easier to follow.
What Shadowboxing Really Means (Simple Explanation)
Shadowboxing is basically practicing boxing movements without any opponent or equipment. You throw punches in the air, move around, defend, and imagine real fight situations. It’s not about hitting something; it’s about learning control, timing, and movement.
Once you understand this, shadowboxing stops feeling random and starts feeling like structured training. It trains both your mind and body together, which is what makes it so effective.
The Foundation: Mastering Your Boxing Stance and Footwork
Stance Basics
Keep your feet slightly wider than your shoulders and your knees relaxed, not stiff. Your weight should feel balanced, not leaning too much forward or backward. Keep your hands up near your face, elbows close to your body, and your chin slightly tucked down.
All your power starts from your legs, not just your hands. Think of your legs like springs that help you move and punch with strength.
Orthodox vs Southpaw
If you are right-handed, you will usually use an orthodox stance, which means your left foot and left hand stay in front.
If you are left-handed, you will use a southpaw stance, where your right foot and right hand stay forward.
No matter which stance you use, the basics stay the same — keep your guard up, stay light on your feet, and avoid crossing your legs while moving.
Basic Footwork Moves
A half-step is a small movement forward or backward to control distance without losing balance.
A pivot means turning your body slightly on your front foot to change angle and position.
And good movement is all about staying in control — not too close, not too far — so you can attack when needed and stay safe at the same time.
All 16 Basic Boxing Moves (Simple Breakdown for Beginners)
When I started learning shadowboxing, one thing that really helped me was understanding that boxing is not just random punches. There are structured moves, and once you know them, everything becomes easier to practice and combine. You don’t need to master all of them at once, but knowing them gives you a clear direction.
Here are the 16 basic boxing moves explained in a simple way:
Punches (1–6)
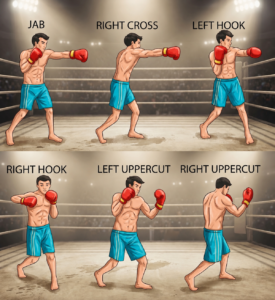

1. Jab
This is your front hand punch. It’s quick, light, and used to maintain distance and control.
How to throw a perfect Jab:
2. Cross
The cross is your power punch. It turns your rear hand into a serious weapon, but it also leaves you exposed if thrown carelessly.
Real power doesn’t come from your arm, but from your whole body working together. As you throw the cross, pivot on your rear foot, rotate your hips and shoulders, and shift your weight forward. This creates a smooth, whip-like motion that drives the punch.
Avoid trying to muscle it with your arm alone. Your legs and core generate the force, your arm just delivers it.
Throw the punch straight from your guard, turn your fist over at the end, and keep your lead hand tight to your face for protection. The cross is powerful, but it requires control and balance to use effectively.
3. Lead Hook
A side punch with your front hand, targeting the opponent’s head or body.
4. Rear Hook
Same as hook but with your back hand, usually more powerful.
Thrown in a wide, horizontal arc, hooks are dangerous because they come from angles your opponent doesn’t easily see, giving them real knockout potential.
Keep your arm bent at about a 90-degree angle. The power comes from your whole body, not just your arm. Pivot on the ball of your foot (lead foot for a lead hook, rear foot for a rear hook) while rotating your hips and shoulders to drive the punch.
Always keep your other hand up to protect your face. Hooks can target both the head and body.
The lead hook is quick and sharp, while the rear hook carries more power and reach. Master both, and you add serious impact to your punches.
5. Lead Uppercut
An upward punch with your front hand, useful when opponent is close.
6. Rear Uppercut
A strong upward punch using your back hand.
The lead uppercut is quick and useful at close range, great for slipping under a high guard. The rear uppercut carries more power and reach, making it a strong option for driving through defenses.
Power comes from your legs, not your arms. Slightly bend your knees, then drive upward using your legs and hips, transferring that energy through your core into the punch.
Keep your elbow bent and close to your body. This is a tight, controlled strike, not a wide swing. Rotate your body as you punch, but focus on that upward motion.
Defense Moves (7–12)
7. High Guard (Block)
Keeping your hands up to block punches.
8. Parry
Redirecting the opponent’s punch slightly using your hand.
9. Slip Left
Moving your head slightly to the left to avoid a straight punch.
10. Slip Right
Moving your head to the right to dodge punches.
11. Duck
Bending down to avoid hooks or high punches.
12. Roll (Bob & Weave)
A circular head movement to slip under punches and come back up.
Footwork & Movement (13–16)
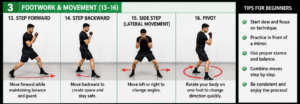

13. Step Forward
Moving forward while maintaining balance and guard.
14. Step Backward
Moving back to create space and avoid attacks.
15. Side Step (Lateral Movement)
Moving left or right to change angles.
16. Pivot
Rotating your body on one foot to change direction quickly.
How I Used These Moves in My Shadowboxing
In the beginning, I didn’t try to use all 16 moves together. I started with just jab, cross, and basic footwork. Then slowly, I added hooks, uppercuts, and simple defense movements like slipping and ducking.
Over time, combining these moves made my shadowboxing feel more real and controlled. Instead of random punching, I started moving with purpose.
You don’t need to rush. Start with basics, repeat them daily, and slowly add more moves. That’s what helped me improve, and it can work for you too.
My Beginner Shadowboxing Routine at Home
I keep my routine simple so it doesn’t feel overwhelming. I always start with a warm-up, then move into shadowboxing rounds, followed by footwork training and light strength work.
Shadowboxing Basics (Foundation Work)
Starter Combinations
- 1-2 (Jab–Cross)
- 1-2-3 (Jab–Cross–Lead Hook)
- 1-1-2 (Double Jab–Cross)
Drill each slowly, then add pace only when they feel smooth.
| Drill | Time | Focus |
|---|---|---|
| Basic stance | 1–2 minutes | Balance and posture |
| Jab–Cross combo | 2–3 minutes | Punch technique |
| Defense movement | 2 minutes | Reaction and head movement |
| Free shadowboxing | 2–3 minutes | Flow and creativity |
I focus on clean movements first. Speed comes later naturally.
Footwork Training (Agility Ladder & Tape Drills)
Footwork is one of the most important parts of shadowboxing. I use an agility ladder or sometimes just tape on the floor to create patterns.
| Drill | Time | Focus |
| Ladder in-out steps | 2–3 minutes | Speed and coordination |
| Side steps | 2 minutes | Lateral movement |
| Forward-back steps | 2–3 minutes | Balance control |
| Zig-zag movement | 2 minutes | Agility and reaction |
This made my movement feel more controlled and boxer-like over time.
Strength Support for Better Performance
To support shadowboxing, I also include simple bodyweight exercises. These help improve strength, stability, and endurance.
| Exercise | Reps/Time | Benefits |
| Push-ups | 10–15 reps | Upper body strength |
| Plank | 30–45 seconds | Core stability |
| Squats | 10–15 reps | Leg strength |
| Lunges | 10 each leg | Balance and control |
This combination makes shadowboxing more powerful and controlled.
![]()

My Weekly Routine That Kept Me Consistent
My routine is simple and balanced so I can stay consistent without burnout. In the morning, I do shadowboxing, footwork drills, and agility ladder training. This helps me start the day active and energetic.
In the evening, I focus on strength training and core workouts, which helps build muscle, control, and stability. Splitting workouts like this made it easier to stay consistent and avoid fatigue.
| Day | Morning Session | Evening Session |
| Monday | Shadowboxing + footwork | Strength training |
| Tuesday | Agility ladder + mobility | Core workout |
| Wednesday | Shadowboxing + flow drills | Strength training |
| Thursday | Rest or light movement | Rest |
| Friday | Shadowboxing + speed drills | Strength training |
| Saturday | Footwork + conditioning | Core + stretching |
| Sunday | Rest | Rest |
Common Mistakes Beginners Make
Many beginners start shadowboxing too fast without learning proper form. I also made this mistake in the beginning. Another common mistake is ignoring footwork and focusing only on punches.
Once I slowed down, focused on movement, and built a structure, everything improved. Shadowboxing works best when you treat it like skill training, not just random exercise.
Can You Learn Shadowboxing at Home Without Equipment?
Yes, absolutely. You don’t need a boxing bag or gym. Shadowboxing is meant to be done without equipment. All you need is space and consistency.
Even simple drills can improve your fitness, speed, coordination, and stamina if done regularly.
If I could build a routine from scratch at home, anyone can do it too.
Final Thoughts:
Shadowboxing changed how I see fitness. It’s not just about working out — it’s about learning how to move better and stay active in a simple way.
Start small, stay consistent, and focus on control instead of speed in the beginning. That’s what makes real progress happen.
FAQs:
1. Can I learn shadowboxing without a boxing bag?
Yes, shadowboxing is designed to be done without equipment.
2. Is shadowboxing good for fitness?
Yes, it improves stamina, coordination, and speed.
3. How long should beginners shadowbox?
Start with 10–15 minutes daily.
4. Do I need equipment for footwork training?
No, you can use tape or simple floor markings.
5. What is agility ladder training?
It improves speed, coordination, and foot movement patterns.
6. How fast can I see results?
Most people notice changes in 3–6 weeks with consistency.
![]()
![]()